Writing Custom Rules in Wazuh
In this blog I’ll mention and explain about writing custom rules in Wazuh for detecting system attacks.

What are the rules and what role do they in Wazuh?
The rules in Wazuh is used to analyze log datas, detect specific security logs and generate alerts when necessary. The rules form the basis of Wazuh’s security monitoring, threat detection and response capabilities.
These rules’re written for identifying specific event or behaviour in the system that maybe doubtful or abnormal.
More revealingly:
So, the log alerts that shown in wazuh-dashboard are defined due to the rules which written inside Wazuh.
This process works like this:
As we know, firstly Wazuh collects log datas from different sources (such as firewalls, clients, servers, network devices and etc.) via wazuh-agent. Then the logs which collected is analyzed accordıng to predefined rules by Wazuh. In the final step the datas in the logs is matched with the predefined rules. If a rule match occurs, so, if the data in the logs meets the conditions of a certain rule, Wazuh displays this in the “dashboard” section as a ‘log alert’.
The log alerts which are detected according to rules, are formed in accordance with certain ‘rule ID’ and specific ‘rule group’.
So, each of the log alerts have their own, different and specific ‘rule ID’ but maybe some of these’re in the same groups.
( Let’s say this expression like this for being clearer: Just think you did SSH Brute Force to any client machine and after this Wazuh alerted the attack. And there’re three different rule descriptions about the attack in the dashboard like these: “Two authentication failure”, “Two or more authentication failure” and “Too many wrong password attempts were entered”. All of these alerts’ IDs are different, for example ‘5000, 5001 and 5002’. But each of these alerts’re in the same rule group example of ‘ssh_rules.xml’.)

Alerts in wazuh-dashboard is associated with this rule IDs and when alerted in the dashboard, owing to these IDs it’s understood which rule is triggered.
And shown as above image I did SSH Brute Force simulation to my own system. And there’re three log alerts and two of them’re the same. As you can see first alert is about successful login to any user so, the rule associated with rule ‘ID 5501' and ‘successful login’, was triggered as soon as I logged into the system.
The second one is about privilege escalation and when I increase my own privilege from ordinary user to ‘root’ privilege, the rule associated with ‘ID 5402’ and ‘successful sudo execution’ was triggered and alerted in wazuh-dashboard. Thus, both of these alerts was triggered owing to the determined rules ie, it’s reported in the form of an alert when suspicious behavior is observed in accordance with the rules.
The main categories of Wazuh rules
There’re two main rule categories in Wazuh. First one is ‘Default Rules’ and another one is ‘Custom Rules’. For writing custom rules in Wazuh we should know these rules types’ difference and what they are.
As shown its name ‘Default Rules’ are the rules which comes by default together with Wazuh’s deployment. When we deploy Wazuh ( separately or inside Docker) by default a broad set of rules is also activated to detect specific attack vectors and abnormal behaviors and these rules are optimized to detect common security threats and incidents.
On the other hand, ‘Custom Rules’ are the rules that are written from users according to their need. Custom rules are used to extend or modify the default rules. That’s what we need and these rules generally added to ‘local_rules.xml’ file.
Writing custom rules
As can be understood from the above, custom rules are collected to ‘local_rules.xml’ file and if we want to write custom rules we should do this action inside this file. Because Wazuh separates this file to ensure that default rules are not affected by changes and custom rules are protected at the same time, Wazuh regularly checks and processes the rules inside file. I wrote custom rules to detect system attacks and show in wazuh-dashboard.
To reach ‘local_rules.xml’ file you can use either wazuh-dashboard or from Ubuntu terminal. In terminal ‘local_rules.xml’ is in ‘/var/ossec/etc/rules/local_rules.xml’. ( Command: sudo nano /var/ossec/etc/rules/local_rules.xml)
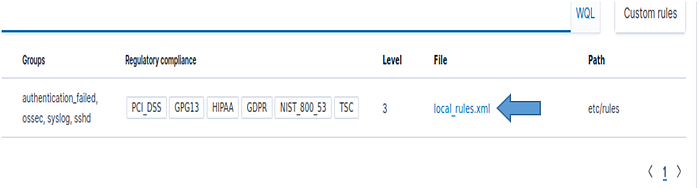
But I reached the file using dashboard. In dashboard use “management>rules” steps consistently as shown below:
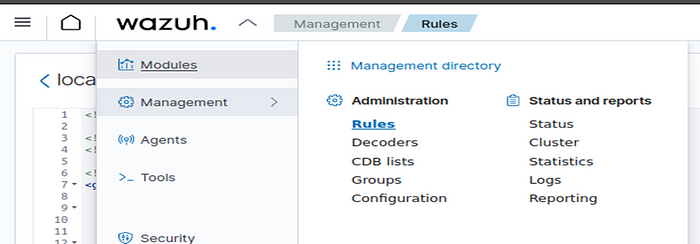
After passing ‘Rules’ section, type ‘local_rules.xml’ and enter inside this file for changing:
FIRST CUSTOM RULE
Alright, let’s write first custom rule to detect alert for system attack.
But how we can do this? For this I wrote custom rule for detecting “SSH Brute Force Attack” for my Linux machine and to trigger this rule like alert log when the attack is done. Let’s see the custom rule and I’ll explain all of the necessary sections:
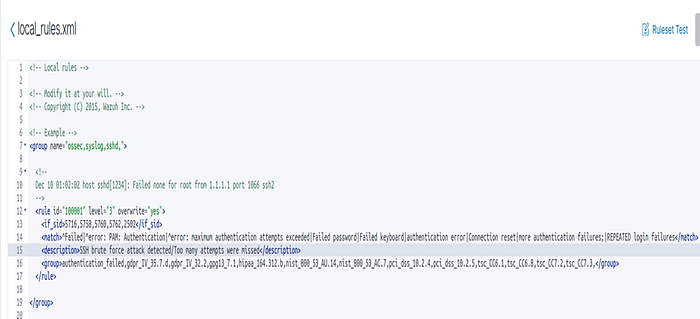
Firstly, we delete the current rule’s parts when we entered inside the file but we keep the parts “group name, rule id, if_sid, match, description, group” shown as above. Because we need these parts to do changes.
REMEMBER!!! (That is, as I mentioned before about ‘Custom Rules’, by modifying the default rule in the ‘local_rules.xml’ file, we write a new custom rule for our purpose.)
1) In the first step we must select ‘group name’ section. This section is about within which group the newly written rule will be triggered. I selected ‘syslog, sshd and ossec’ because of SSH Brute Force. Because, I’ll select appropriate SIDs from ‘sshd’ group to trigger this rule.
2) Second necessary section is ‘rule id’. You can choose custom rule’s ID between ‘100.000 and 1.000.000’. This’s Wazuh’s advice and the reason for this, is to avoid conflicts with Default Rules IDs. I selected ID ‘100001’ for my first custom rule.
3) Next, is the most necessary section called ‘if_sid’. Each ID I wrote in the ‘if_sid’ section is a separate and independent rule IDs. That is, these IDs ( example: 5716, 5758 or 5760) are rules that work independently, and when a suspicious behavior according to their ‘match’ part occurs, these rules are automatically triggered and displayed as a ‘log alert’ on the dashboard.
And after I put the rule IDs related to SSH Brute Force and triggered when a possible attack is made in the ‘if_sid’ part of a general rule I wrote, each SID will now be triggered within a single rule according to its task and displayed on the dashboard will now be represented by a single rule ID.
Now let’s view necessary Rule SIDs’ match or what role will they fulfill in a common custom rule and why I added these rules inside custom rule’s ‘if_sid’ section:
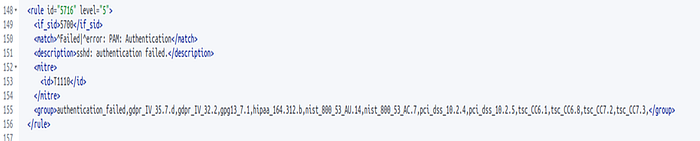
First match of SID is 5716. As you can see, this match is about authentication failure when someone tries to do SSH connection but connection being failure. So, this rule’s helpful for detecting possible attack.
Second one is ‘5758’ SID’s match:

The reason why I added this SID inside the new rule, is there are generally a lot of attempts are included during brute force. For example someone tries 3 or 4 attempts to enter the system but he ( or she) can’t do it and this rule is triggering.
The other SID’s match is ‘5760’’s match.
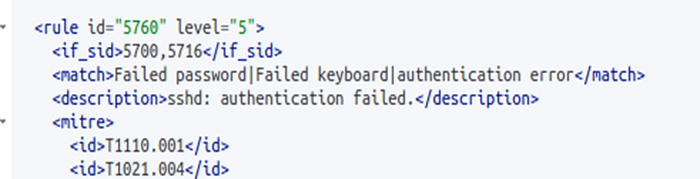
Pay attention to the ‘match’ section. There’re one or more time password failures during the attack. This SID is very convenient and helpful for our purpose.
All of the above SIDs are from “sshd_rules.xml”group file so, owing to our attack purpose this group’ll be the main helpful source for attack simulation and detection.
But I added also SID ‘2502’ from another group file called “syslog_rules.xml”:
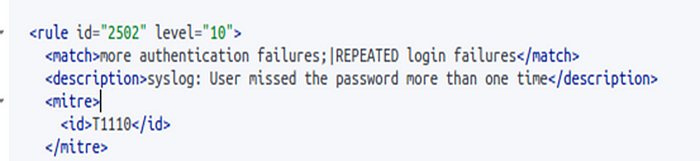
I added this SID because it’s critical source for my purpose. As you can see, this’s about wrong password inputs more than one time. If the user enter wrong password during the SSH connection, this rule SID will be triggered and will be showned in wazuh-dashboard.
4) Next section of custom rule is ‘description’. You can write any descripion whatever you want about your purpose associated with writing the custom rule. I selected ‘SSH brute force attack detected/Too many attempts were missed’ description for my attack simulation and detection in dashboard with ease.
5) ‘group’ section: You can add group section of the first rule ID which you added inside ‘if_sid’ section to the custom rule’s ‘group’ section. As example, I added ‘5716’ rule SID’s group to this custom rule’s ‘group’ section. If you want, you can view this from the images shown below.


After doing every attempts or creating new custom rule, you should restart wazuh-manager because of saving the changes made.
If you write custom rule in dashboard like me, after clicking “save” button Wazuh’ll automatically require to restart manager but if you write the rule in Ubuntu terminal after saving this rule end exiting from the file you must use this command ( sudo systemctl restart wazuh-manager) to restart server.
Testing the rule (Final Step)
Alright, we already finished writing custom rule in Wazuh. But how we can know is this rule working or not?
Of course for this, we must to check this custom rule in a real attack simulation. I did SSH Attack simulation to my Linux system machine to find out whether the rule will be triggered or not:

Yess, here’s the log alert of this brute force. And you can see all off the necessary sections that I wrote inside custom rule, is also alerted and shown in wazuh-dashboard log alerts window:
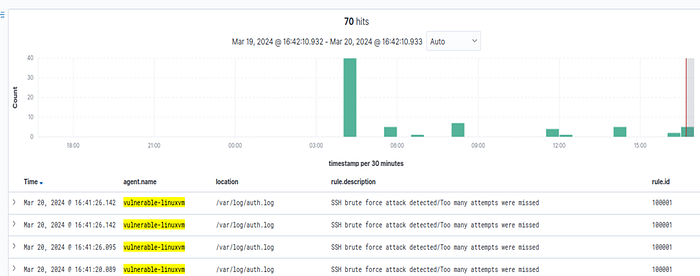
As you can see, the rule with the ID “100001” which I wrote for custom rule was triggered and detected by brute force. Also, we see that the description I wrote in the custom rule is reflected in the alert as well
And here’s the suitability between log alert and SID ‘2502’ that I wrote inside custom rule:
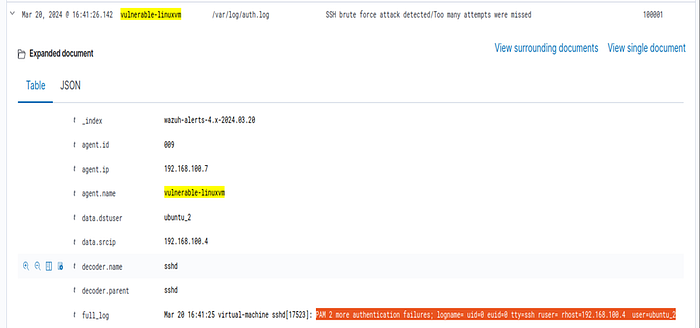
If you remember that, SID ‘2502’ is about “one or more time wrong password attempts”. As can be seen from the ‘full_log’ section of the log alert, this SID is triggered when an abnormal behavior is indeed detected within the custom rule.
With this, we were able to make sure that the first custom rule that written worked.
SECOND CUSTOM RULE (Optional)
After successfully completing custom rule writing to detect Linux SSH Brute Force, I wrote later custom rule for detecting Pash the Hash Attack ( to reach to the target user’s system by using NTLM) for my Windows Server machine.
I wrote this rule inside the same ‘group name’ section called ‘ossec, syslog, sshd, sysmon’ and under the current custom rule.
Let’s view the new custom rule and let me explain its necessary sections especially ‘if_sid’:
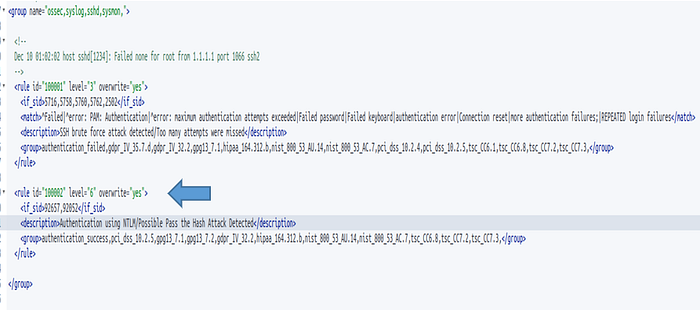
As you can see, new custom rule’s ID will be ‘100002’ and description’ll be ‘Authentication using NTLM/Possible Pass the Hash Attack Detected’. Shown as its name this rule will trigger when the attack occurs to AD Service of Windows Server.
The first SID that I added inside this rule is ‘92657’:

This SID is the main source for detecting Pass the Hash. You can know this by reading its ‘description’. When Pass the Hash is occured remote logon to the user in the system is being performed. That’s why I added this helpful and critical rule to the new custom rule.
Another helpful SID is ‘92052’:
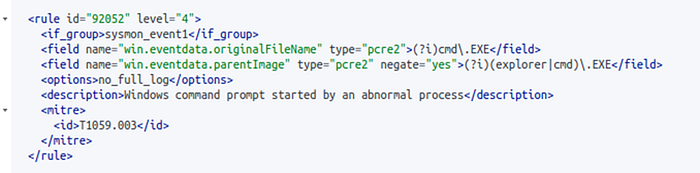
After entering the system using NTLM by Pass the Hash, cmd of the target host opens automatically. And in this process this SID inside new custom rule’ll be triggered.
Okay, the second custom rule’s ready. Let’s test this rule if appropriate attack occurs, is this rule will trigger or not.
I did Pass the Hash simulation by using ‘mimikatz’ tool:
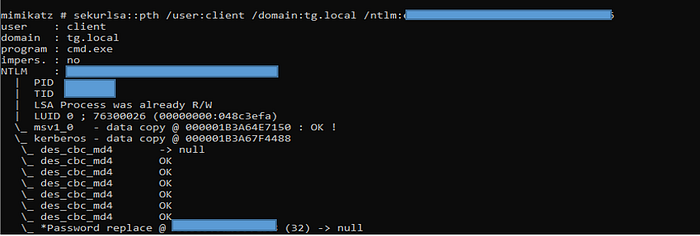
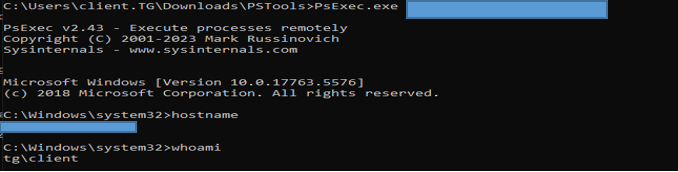
After this I gained ‘system32’ shell of the target host so, I reached the user of target system by Pass the Hash:
Then I checked dashboard for alert log. And yes, indeed the custom rule triggered and alerted:
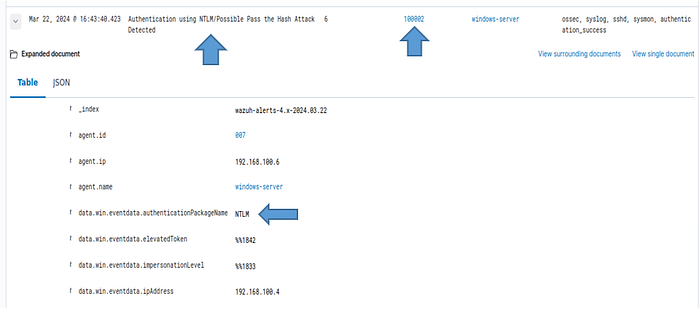
You can see the necessary sections such as ‘description’ and ‘rule.id’ in the image shown as above. These are also the sections that I mentioned inside the second custom rule.
Yes, we have come to the end of a long and interesting blog. Finally, the article “how to write custom rules to detect system attacks” is finished.
I hope, I could help. Thanks for reading!!
